Table of Contents
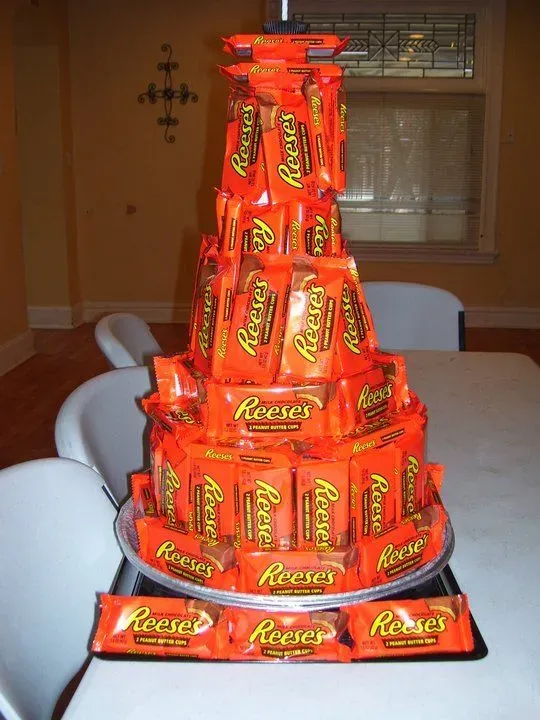
Let's be real. Sometimes a plain old slice of cake just doesn't cut it. You need that extra something, that crunch, that caramel chew, that burst of peanut butter. Or maybe you just have a mountain of leftover Halloween candy staring you down, silently judging your willpower. Whatever the reason, the solution is clear: you need some killer candy bar cake ideas.
Baking the Rich Chocolate Base for Your Candy Bar Cake
Baking the Rich Chocolate Base for Your Candy Bar Cake
Why the Base Cake is Non-Negotiable
Alright, listen up. You can pile all the chopped Snickers and caramel drizzle you want on top, but if the cake underneath is dry or bland, you've just made a decorated disappointment. The base is the foundation, the unsung hero of any truly great candy bar cake. It needs to be moist, tender, and packed with deep chocolate flavor. We're not aiming for a flimsy sponge here; we need something sturdy enough to hold up to hefty layers of frosting and candy, but still melt-in-your-mouth delicious. Get this right, and the rest is just glorious excess.
Secrets to a Seriously Moist Chocolate Cake
Achieving that perfect rich chocolate base for your candy bar cake isn't rocket science, but it does require paying attention. Using quality cocoa powder is key – none of that pale, weak stuff. Black cocoa can give you that dark, almost Oreo-like color and intense flavor. But the real secret weapon for moisture? Often, it's hot liquid, like hot coffee or boiling water, added to the batter. This blooms the cocoa, intensifying the flavor, and contributes to a super moist crumb. Don't shy away from using oil alongside butter; oil keeps cakes moist longer.
Here are a few pointers for Baking the Rich Chocolate Base for Your Candy Bar Cake:
- Use Dutch-process cocoa for a smoother, less acidic flavor.
- Bloom your cocoa with hot liquid before adding it to the batter.
- Don't overmix the batter once the dry ingredients are added; this develops gluten and can lead to a tough cake.
- Check for doneness with a toothpick – it should come out with moist crumbs, not completely clean.
- Let the cakes cool slightly in the pans before inverting them onto a wire rack to cool completely.
Whipping Up the Creamy Frosting and Candy Bar Filling

Whipping Up the Creamy Frosting and Candy Bar Filling
Crafting the Perfect Creamy Base
so you've got that beautiful, moist chocolate cake cooling. Now comes the fun part: the frosting. For a candy bar cake, you need something that's going to play well with all that sugar and texture you're about to add. A classic cream cheese frosting is a solid choice because its slight tang cuts through the sweetness of the candy. Buttercream works too, but make sure it's not overly greasy. The goal is creamy, spreadable goodness that acts like glue for your chopped candy.
Whipping Up the Creamy Frosting and Candy Bar Filling starts with getting the frosting texture just right. Make sure your butter and cream cheese (if using) are at room temperature. Like, actually room temperature, not "I took it out of the fridge five minutes ago" temperature. This prevents lumps. Sift your confectioners' sugar. Yes, it's an extra step, but it makes a huge difference in getting that silky smooth texture. Don't rush the whipping; let it go for a few minutes on medium speed to incorporate air and get it light and fluffy.
Incorporating the Candy Bar Chaos
Now for the main event: the candy bars. You can chop them up and fold them directly into the frosting, layer them between the cake layers, or pile them on top. A mix is usually best. Think about the textures and flavors you want. Snickers add caramel, nougat, and peanuts. Heath bars give you that crisp toffee crunch. Reese's bring peanut butter. The possibilities are endless. Just make sure you chop them into manageable pieces – you want bites of candy, not jawbreakers.
When folding candy into the frosting, do it by hand with a spatula at the end. Your mixer will just break the candy into tiny, sad crumbs. Be generous. This isn't a time for restraint. Some people like to chill the chopped candy slightly before adding it, especially if it's prone to melting, like chocolate bars without inclusions.
Popular Candy Bar Choices for Cake:
- Snickers (Peanut, Caramel, Nougat, Chocolate)
- Heath/Skor (Toffee, Chocolate)
- Reese's Peanut Butter Cups (Peanut Butter, Chocolate)
- Butterfinger (Crispy Peanut Butter, Chocolate)
- Milky Way (Caramel, Nougat, Chocolate)
- Kit Kat (Wafer, Chocolate)
Assembling Your Layers: Creating the Ultimate Candy Bar Cake
Assembling Your Layers: Creating the Ultimate Candy Bar Cake
Stacking Smart: Leveling and Crumb Coating
you've got your beautiful cake layers, cooled and ready to go. Don't even think about stacking them if they're not level. A wobbly cake is a sad cake, destined for structural failure under the weight of all that frosting and candy. Grab a serrated knife – a bread knife works perfectly – and slice off any domed tops. Make them flat. Precision matters here if you want something that doesn't look like the Leaning Tower of Pisa after an earthquake.
Before you start slathering on the main frosting, do yourself a favor and apply a thin crumb coat. This is a thin layer of frosting all over the cake, top and sides. Its job is to trap any loose crumbs. Pop the cake in the fridge or freezer for 15-20 minutes until the crumb coat is firm. This step is non-negotiable for a clean final frosting layer. Trust me, fighting crumbs while trying to make it look pretty is a battle you will lose.
Layering the Good Stuff: Frosting and Candy Bar Filling
Now for the fun part of bringing your candy bar cake ideas to life. Place your first chilled, crumb-coated layer on your serving plate or cake stand. Dollop a generous amount of your main frosting onto the center and spread it out evenly, right to the edges. Don't be stingy. This isn't the time for calorie counting. This layer of frosting is where a good portion of your chopped candy bar filling goes.
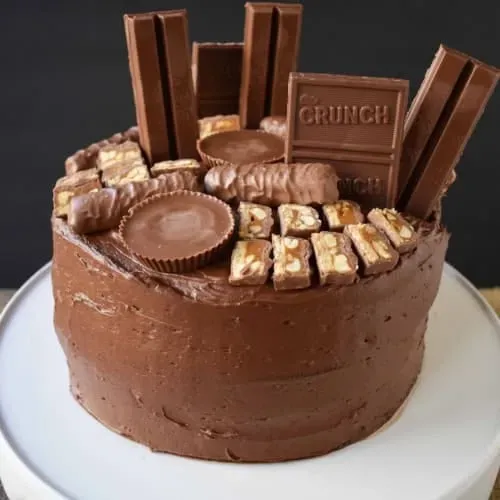
Sprinkle a thick layer of your chosen chopped candy – Snickers, Heath, Reese's, a mix – onto the frosting. Gently press it down slightly. Add the next cake layer on top, lining it up carefully. Repeat the frosting and candy layers. For the top layer, frost the top and sides smoothly, or go wild with swirls and peaks. Then, the final decoration is more chopped candy piled high, maybe some chocolate drizzle, or even whole mini candy bars. This is where your candy bar cake ideas truly shine.
Quick Checklist for Assembly:
- Ensure cake layers are completely cool and level.
- Apply a thin crumb coat and chill until firm.
- Use a generous amount of frosting between layers.
- Distribute chopped candy evenly over the frosting layers.
- Chill the assembled cake before the final frosting layer if it feels unstable.
- Decorate the top lavishly with more candy!
Beyond the Basics: More Delicious Candy Bar Cake Ideas
Beyond the Basics: More Delicious Candy Bar Cake Ideas
Matching Your Cake to the Candy Vibe
Alright, so you've mastered the basic chocolate candy bar cake recipe. But why stop there? The world of candy bar cake ideas is vast and glorious. Instead of just adding chopped candy to a chocolate cake, think about tailoring the cake itself to match your chosen bar. For a Snickers cake, maybe a peanut butter swirl or a layer of caramel baked right into the chocolate batter? Or perhaps a vanilla cake with swirls of peanut butter for a Reese's-themed creation? A white cake with toffee bits baked in would be perfect for a Heath bar cake. Get creative with extracts too – a hint of caramel or peanut butter extract can really elevate the flavor profile and make the base cake feel intentional, not just a vehicle for candy.
Adding Layers of Flavor (Literally and Figuratively)
Beyond just chopping and scattering, consider other ways to incorporate those candy bar flavors and textures. Caramel or peanut butter drizzles between layers or poured over the top are simple but effective. A chocolate ganache made with heavy cream and melted chocolate can provide a rich, decadent topping that pairs beautifully with most candy bars. How about a layer of actual nougat or a peanut butter filling between the cake layers? These extra steps take your candy bar cake ideas from "cake with candy on it" to a fully integrated dessert experience. Don't be afraid to experiment with texture – crispy chocolate pearls, salty pretzels, or even potato chips can add an unexpected but welcome crunch that complements the sweetness of the candy.
Creative Additions for Your Candy Bar Cakes:
- Salted Caramel Drizzle
- Peanut Butter Swirls (in batter or frosting)
- Chocolate Ganache Glaze
- Chopped Pretzels for Salt and Crunch
- Crushed Cookies (like Oreos or shortbread)
- Whipped Ganache Filling
- Toasted Nuts (peanuts, pecans, almonds)
Troubleshooting and Tips for Perfect Candy Bar Cakes
Troubleshooting and Tips for Perfect Candy Bar Cakes
Dealing with Cake Disasters: Sinking and Dryness
Look, nobody gets a perfect cake every single time. If your cake layers sunk in the middle, you probably opened the oven door too early, or your leavening agents were old. Check those expiration dates on your baking powder and soda, seriously. If it's dry, you might have overmixed the batter, baked it too long, or your oven temperature is off. Get an oven thermometer – they're cheap and save a lot of heartache. Make sure you're measuring your flour correctly, too; spooning it into the cup rather than scooping can prevent adding too much, which dries things out fast.
Handling the Candy: Melting and Distribution Woes
Adding candy bars isn't just about chopping and tossing. If you're folding softer candies like caramels or nougat into a warm frosting, they can melt into a sticky mess. Chill those softer candies before chopping, and make sure your frosting isn't warm. When layering chopped candy between cakes, try to keep it away from the very edge; it can sometimes cause the layers to slide, especially if the frosting isn't firm enough. For decorating the top, consider using slightly larger pieces or even whole miniatures for visual impact and easier handling than tiny crumbs that might get lost.
Quick Fixes for Common Issues:
- Sinking Cake: Don't open the oven door until the minimum bake time is reached. Check leavening freshness.
- Dry Cake: Use an oven thermometer. Spoon and level flour. Don't overmix.
- Frosting Too Thin: Add more sifted confectioners' sugar, a tablespoon at a time.
- Frosting Too Thick: Add milk or cream, a teaspoon at a time.
- Candy Melting: Chill softer candies before chopping and mixing into frosting.
- Cake Layers Sliding: Ensure cake is level. Use a crumb coat and chill. Don't pile candy too close to the edge.
Your Sweet Victory: Enjoying Your Candy Bar Creation
So there you have it. You’ve taken a humble cake and elevated it into something truly spectacular, a monument to all things chocolate and chewy. No need for fancy techniques or unattainable ingredients. Just good cake, good frosting, and a healthy dose of your favorite candy bars. Whether you stuck to the classic chocolate and pecan combo or ventured into more adventurous territory, you've created a dessert that's less about perfection and more about pure, unadulterated joy. Slice it up, share it (if you can bear to), and bask in the glory of your candy bar cake masterpiece. Just try not to eat the whole thing yourself in one sitting. We won't judge, but your dentist might.